Controlling robots with microcontrollers simplified
Write the controller code on a micro:bit, send commands over 2.4 GHz radio, and drive a Mecanum robot car.


Magor Köllő
Software Engineer and Team Lead specializing in the development of performance-critical connectivity systems for global financial exchanges. Experienced in bridging high-frequency trading (HFT) architectures with autonomous generative AI systems to automate software control workflows. Alongside his professional work, he is deeply dedicated to community building and STEM education, actively leading a youth NGO to empower and train the next generation.
About this workshop
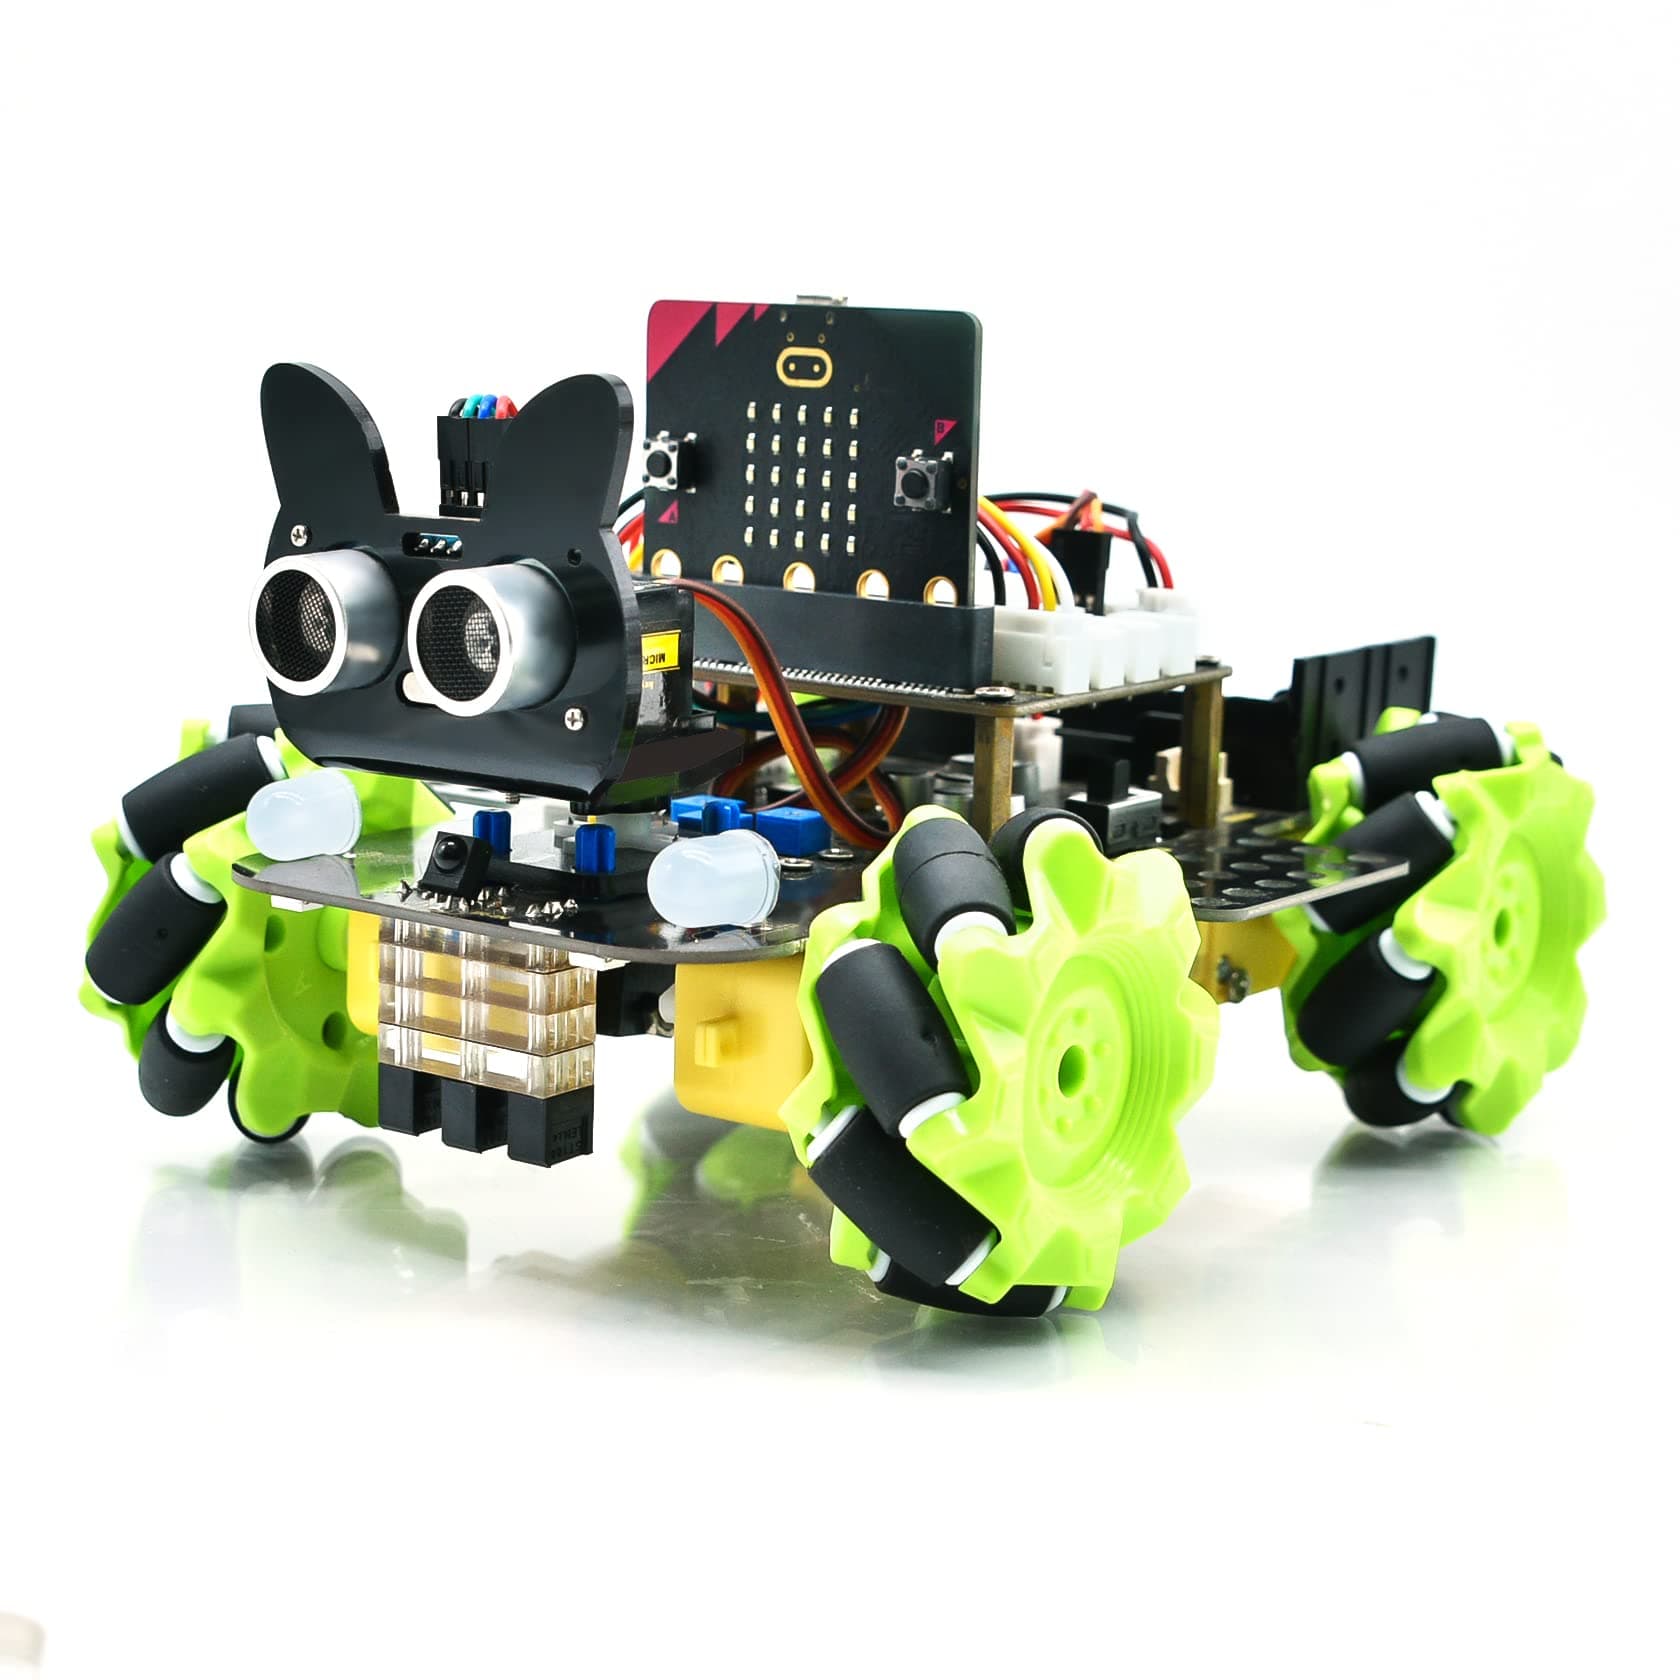
How can a robotic car be controlled wirelessly? In this 50-minute hands-on workshop, participants get direct, accessible experience with how embedded devices talk to each other. Each team works with a Keyestudio KS4034 4WD Mecanum Robot Car V2.0 that runs the robot program. Your task is to turn a second BBC micro:bit V2 into a controller: tilt it, and the car follows, with every command travelling over 2.4 GHz radio.
Controller
A micro:bit V2 in your hand: buttons, accelerometer and a 5×5 LED display.
Link
Built-in 2.4 GHz micro:bit radio, one radio group per team, short text commands.
Robot
KS4034 Mecanum car: four motors, drives, turns and slides sideways, with four RGB lights.
Agenda
- 00–05 minWelcome & hardware
The micro:bit, the robot car, and how devices talk to each other: radio, Bluetooth, Wi-Fi, infrared.
- 05–15 minGetting to know the micro:bit
What is on the board, a tour of MakeCode Blocks, and a few warm-up exercises.
- 15–35 minBuilding the controller
Step by step in MakeCode Blocks: emergency stop, lights, sliding, and steering by tilt.
- 35–45 minAI demo with Python
The same controller in Python, with the help of an AI assistant.
- 45–50 minQ&A
Questions, and trying out the finished controller.
Welcome & hardware
How devices talk
TV remotes. Our car has an IR receiver too, so it also obeys a small remote.
micro:bit to micro:bit messages. Every micro:bit in the same radio group hears every message. This is what we use today.
Phones talking to headphones, fitness trackers and app-controlled robots. Low power.
Internet access and lots of data: cameras, smart home hubs, boards such as the ESP32. Uses more power.
Smart home devices (bulbs, sensors) that pass messages to each other.
Tiny amounts of data over long distances, such as sensors in fields or across a city.
Getting to know the micro:bit
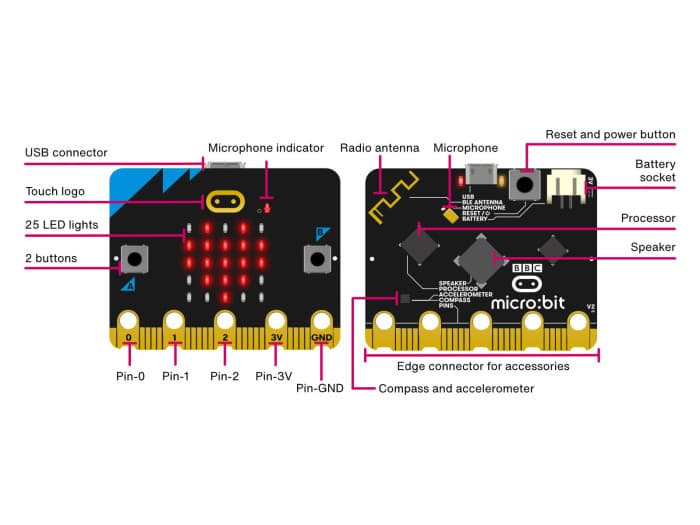
On the board
- Buttons A and B (and pressing both at once: A+B)
- 25 red LEDs as a 5×5 display
- Accelerometer: senses tilt and shake
- Compass, temperature and light sensing
- Microphone, speaker and touch-sensitive logo (V2)
- Radio and Bluetooth antenna
- Edge connector pins for motors, lights and sensors
MakeCode in one minute
- The simulator on the left runs your program before you download it.
- “on start” runs once when the micro:bit powers up; “forever” repeats over and over.
- Block categories we need: Basic, Input, Radio, Logic, Variables and Math.
- The Download button sends the program to the micro:bit over USB.
Warm-up
- Show your name when button A is pressed (Input → “on button A pressed”, Basic → “show string”).
- Show a heart when you shake the micro:bit (Input → “on shake”, Basic → “show icon”).
Setup
- Open makecode.microbit.org and create a New Project. Stay in Blocks.
- Connect your micro:bit with the USB cable.
- Click Download. The first time, pair the micro:bit when the browser asks. Alternatively, drag the downloaded .hex file onto the MICROBIT drive.
The car's commands
| Command | Meaning |
|---|---|
| F | Drive forward |
| B | Drive backward |
| L | Turn left on the spot |
| R | Turn right on the spot |
| SL | Slide left (sideways, without turning) |
| SR | Slide right (sideways, without turning) |
| S | Stop |
| NEXT_COLOR | Switch the lights to the next colour: 0 off, 1 red, 2 orange, 3 yellow, 4 green, 5 blue, 6 purple, 7 white, then off again |
| EMERGENCY | Emergency stop on/off: the car stops, the lights turn red, and it ignores movement until the next EMERGENCY |
Rules
- Send everything with Radio → “radio send string”, on your team’s radio group.
- Movement commands must be repeated: the car stops by itself if no movement command arrives for 80 ms. Send one every 40 ms.
- NEXT_COLOR and EMERGENCY are sent once per press, not repeatedly.
Step 1: Join the radio group
Make the controller talk on the same radio group as the car.
In MakeCode Blocks
- From Radio, drag “radio set group” into “on start” and set it to your team’s number (you get it at the start of the session).
Nothing visible yet. Every later message now reaches the car.
Step 2: Emergency stop by shaking
The most important button first: a safe way to stop the car.
In MakeCode Blocks
- Add Input → “on shake”.
- Inside it, put Radio → “radio send string” with the text EMERGENCY.
- Add Basic → “pause (ms)” 200 after it, so one shake sends only one message.
Shake the controller: the car stops and its lights turn red. Shake again to release it.
Step 3: Change colour with A+B
Send NEXT_COLOR once per press, even if the buttons are held down.
In MakeCode Blocks
- Create two variables in Variables: last_ab and ab_state. In “on start”, set last_ab to false (Logic).
- In “forever”, set ab_state to Input → “button A+B is pressed”.
- Add an “if”: when ab_state is true and last_ab is not true (Logic → “and”, “not”), send the string NEXT_COLOR and pause 150 ms.
- After the “if”, set last_ab to ab_state.
Each press of A+B steps the lights to the next colour. Holding the buttons does not make them flicker through every colour. That is why we remember the previous state.
Step 4: Slide with A and B
Use the buttons to make the car slide sideways.
In MakeCode Blocks
- In “forever”, below the colour block, add an “if / else if / else”.
- If button A is pressed, send SL. Else if button B is pressed, send SR. Else, send S.
- At the very end of “forever”, add “pause (ms)” 40.
Hold A: the car slides left. Hold B: it slides right. Let go: it stops, because now S is sent (and the car would stop anyway once the messages stop).
Step 5: Steer by tilting
Replace the “else: send S” with steering by tilt, using the accelerometer.
In MakeCode Blocks
- In the “else” branch, set two new variables: pitch to Input → more → “rotation (°) pitch”, and roll to “rotation (°) roll”.
- If the absolute value of pitch is less than 20 and the absolute value of roll is less than 20 (Math → “absolute of”), send S. The board is held flat.
- Else, if the absolute value of roll is at least the absolute value of pitch, the tilt is sideways: send L if roll is less than 0, otherwise send R.
- Otherwise the tilt is forward or back: send F if pitch is less than 0, otherwise send B.
Tilt forward: the car drives forward. Tilt back: it reverses. Tilt left or right: it turns. Hold it flat: it stops. If forward and back are swapped, swap F and B.
The complete controller from the hands-on tasks. Flash it onto your micro:bit to try it out, or open it in MakeCode and compare it with your own blocks.
Extra task 1: Feedback on the display and sound
Easy · controller only, with the current commandsMake the controller show which way it is sending the car, and give a sound for the emergency stop and the colour change. Then the controller no longer sends blind.
In MakeCode Blocks
- Create a variable cmd. Wherever you send F, B, L, R, SL, SR or S, also set cmd to the same text.
- Add a second “forever” block. In it: if cmd = F, show arrow North; if B, South; if L or SL, West; if R or SR, East; otherwise, clear screen.
- Why a second “forever”? Showing an arrow takes a moment. In its own loop it does not slow down the radio messages. If they paused for more than 80 ms, the car would stop.
- In “on shake”, after sending EMERGENCY, add Basic → “show icon” with the X icon and a short melody from Music. Choose the “in background” option, so the program does not wait for the music.
- In the A+B colour branch, add a short tone from Music, also played in the background.
The arrow follows your tilt, shaking shows an X with a sound, A+B beeps, and the car still drives smoothly.
Extra task 2: Diagonal moves and speed
Hard · changes the robot program tooExtend the car’s commands on both sides: FL and FR for diagonal driving, and SPD for changing the speed.
In MakeCode Blocks
- Open DeepDive Robot.hex in MakeCode (Import → Import File). This is the car’s program.
- Diagonal: a Mecanum car drives diagonally when only two opposite wheels turn. Create car_forward_left: upper right and lower left motors forward, the other two at speed 0. Create car_forward_right: upper left and lower right motors forward, the other two at speed 0.
- In the car’s movement chain (where it checks F, B, L…), add: if the command is FL, call car_forward_left; if FR, call car_forward_right.
- Speed: create a variable speed in the car’s program, set it to 50 at start, and use it instead of the fixed 50 in every motor block.
- Where the car handles NEXT_COLOR and EMERGENCY, add SPD: each SPD moves speed to the next step (30 → 50 → 80 → 30). It must sit there, before the movement handling, because SPD is sent once and is not a movement.
- Flash the new program onto the car’s micro:bit.
- In the controller: when tilted forward and sideways at the same time (pitch below -20 and roll below -20, or pitch below -20 and roll above 20), send FL or FR. Put this check first, before the other tilt checks. Add Input → “on logo pressed” that sends SPD once.
Tilting forward-left or forward-right drives the car diagonally without turning, and touching the logo changes its speed.
AI demo with Python
MakeCode can show the same program as Python. We ask an AI assistant to explain it, change it and extend it. For example: “add a button that makes the car spin in place”. Then we check its answer line by line.
def on_gesture_shake():
    radio.send_string("EMERGENCY")
    basic.pause(200)
input.on_gesture(Gesture.SHAKE, on_gesture_shake)

last_ab = False
ab_state = False
radio.set_group(1)  # use your team's radio group

def on_forever():
    global ab_state, last_ab
    ab_state = input.button_is_pressed(Button.AB)
    # 1. A+B press edge (sends a single pulse for the colour change)
    if ab_state and not (last_ab):
        radio.send_string("NEXT_COLOR")
        basic.pause(150)
    last_ab = ab_state
    # 2. Slide buttons
    if input.button_is_pressed(Button.A):
        radio.send_string("SL")
    elif input.button_is_pressed(Button.B):
        radio.send_string("SR")
    else:
        # 3. Tilt steering
        pitch = input.rotation(Rotation.PITCH)
        roll = input.rotation(Rotation.ROLL)
        if abs(pitch) < 20 and abs(roll) < 20:
            radio.send_string("S")
        elif abs(roll) >= abs(pitch):
            if roll < 0:
                radio.send_string("L")
            else:
                radio.send_string("R")
        elif pitch < 0:
            radio.send_string("F")
        else:
            radio.send_string("B")
    basic.pause(40)
basic.forever(on_forever)Resources
Microsoft MakeCode for micro:bit
The browser-based Blocks editor we use in the workshop.
micro:bit radio blocks
Reference for the radio blocks: groups, sending and receiving.
micro:bit Educational Foundation
Projects, lessons and guides for the micro:bit.
Keyestudio KS4034 docs
Assembly and programming guide for the Mecanum robot car.